![]()
Oil Separator Installation Guide
For Continental Engines
![]()
Oil Separator Installation Guide
For Continental Engines
Installation Guidelines - Continental C-65, C-85, & C-90
On some of the lower horsepower engines, there may be no accessory case or plug, which can be removed and replaced with a hose fitting. In this case there are two possible solutions. The first, which is the most labor intense, would be to remove the #1 cylinder rocker cover, drill a 7/16" hole in the center of the lower half of the cover, keeping this fitting above the level of the push rod housings. Place an AN315-7 nut over the hole and weld to the rocker cover. Clean rocker cover and nut and repaint. Install an MS20852-4, 90-degree elbow fitting, with a jam nut, washer and o-ring packing. Leave the fitting loose until the installation is complete. Install the rocker cover with a new gasket. Run 1/4" ID aluminum tube thru the baffle using a rubber grommet for abrasion protection and connect to the separator with a small piece of hose and clamps.
If rerouting an existing breather line, you may need to block existing holes in the baffling material and or make new holes in different locations. Normally the breather line will need to take a high route to the firewall from the connection point at the front area of the crankcase. Be sure to use rubber grommets for all holes in the baffling to prevent abrasion of the line.
An alternate method of returning the oil would be the use of RMJ-AERO's Self Sealing Clamp On Adapter. The only requirement for installation, is drilling a 1/4" diameter hole in the oil filler neck. The stainless steel, self-sealing clamp provides a return port connection to the tank using one bolt for clamping and sealing. Instructions for installation are included with the adapter. Order Pt #C103 for Continental engines.
Connect the separator drain to the port of your choice with oil resistant tubing unless piping with aluminum tube. We recommend silicone tubing, which can handle elevated temperatures. Remember this is not a pressurized line. It is very near atmospheric pressure during operation. If you cannot find silicone tubing locally, contact RMJ-AERO. We stock 1/4" tubing and can cut any length required. (Current prices can be found on the Prices & Warranty page.) Use Aero-Seal or Breeze Miniature hose clamps for installing all separator hose connections.
Installation Guidelines - Continental O-200
The O-200 engine has one oil return port available. It is located on the lower left side of the accessory case near the alternator. It has 3/8" NPT threads. The existing plug can be removed and replaced with a 3/8" NPT x 1/4" tube adapter for easy connection to the separator oil return line. As with all installations the oil return line from the separator must run down slope to the connection point on the engine. An alternate method of returning the oil would be the use of the "optional" Self Sealing Clamp On Adapter, to the oil sump filler neck. Order Pt #C103 for Continental engines.
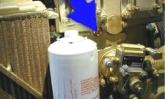
 Separator Installed on a Continental O-200A |
 Rocker Cover Oil Return Line Installation |
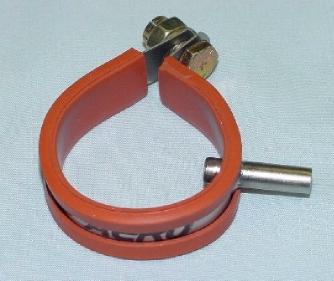 C103 Self Sealing Clamp On Adapter for Continentals |
 Clamp On Adapter installed on O-200A |
| Click on any picture to see a close-up. | |||
Installation Guidelines - Continental 300, 400, & 500 Series
The sand cast Continental engine cases have three low ports which oil can be returned to. Each is closed with a hex plug. The lighter engine's port is located in about the middle of the accessory case. The heavier engine's ports are located below and between the rear two cylinders and in the accessory case. Any of these ports will work for the oil return connection point. Replace the plug with a hose fitting and connect the separator oil return line. The newer procast Continentals have NO useable plugged ports. In this case, the best alternative is to install the rocker cover return similar to that listed for the C-65 thru C-90 engines. As with all installations the oil return line must run down slope to the connection point on the engine.
 400 Series Oil Return Port In Accessory Case |
 Oil Return Port - 300, 400, & 500 Series All Similar |
Click on this link to see the clamp installation guide.
Self Sealing Clamp On Adapter Installation Guide For Continental Engines
RMJ-AERO Pages
[RMJ-AERO Main Page]
[Oil Separator]
[Custom Fabrication Services]
[General Installation Guide]
[Separator Maintenance]
[Aerobatic Elbow]
[Continental Installation Guide]
[Continental Clamp On Adapter Installation Guide]
[Lycoming Installation Guide]
[Lycoming Clamp On Adapter Installation Guide]
[Prices & Warranty]
[RMJ-AERO Gallery]
|
RMJ-AERO Aviation Products for the Homebuilder 402 Tyrone Drive Forsyth, IL 62535
E-Mail: info@rmjaero.com |
 Join & Support The EAA And Your Local EAA Chapter God Bless The USA |